Learn how to restore rusty cast iron cookware with expert techniques. Includes rust removal, re-seasoning, maintenance tips, and common mistakes to avoid.
Introduction: Why Cast Iron Rusts and How to Save It
Cast iron cookware is prized for its durability, heat retention, and natural non-stick surface—but it isn’t immune to rust. Whether you’ve inherited a forgotten skillet or neglected your favorite Dutch oven, rust can sneak in and compromise its usability.
The good news? Even heavily rusted cast iron can be restored to its former glory. In this guide, you’ll learn how to clean, re-season, and maintain cast iron using safe, proven techniques that will preserve your pan for decades to come.
What Causes Rust on Cast Iron?
Exposure to Moisture and Air
The number one enemy of cast iron is water. When iron is exposed to air and moisture, it undergoes oxidation—creating that familiar reddish-orange rust layer.
Improper Cleaning or Drying
Leaving cast iron to air dry, soaking it, or washing it with soap without drying it quickly can lead to rust, especially on bare spots where seasoning has worn away.
Storage Mistakes
Storing cast iron in a humid environment, stacking it with other cookware, or covering it tightly without airflow can trap moisture and create rust spots.
Cooking Acidic Foods Before Seasoning is Mature
Tomatoes, vinegar, and citrus can strip seasoning and expose raw iron to moisture, speeding up rust formation.
Can Rusty Cast Iron Be Saved?
Types of Rust: Light, Moderate, Severe
- Light Rust: Orange dust or spotting. Easily removed with mild scrubbing.
- Moderate Rust: Patchy rust over much of the surface. Needs deeper cleaning.
- Severe Rust: Thick scale or pitting. May require electrolysis or restoration tools.
When to Restore vs. When to Replace
In most cases, restoration is worth it—even severe rust can be reversed. Only pans with deep cracks, major holes, or structural damage may be beyond saving.
Tools and Materials You’ll Need for Cast Iron Restoration
Basic Cleaning Supplies
- Dish soap (for initial cleaning only)
- Nylon or stiff-bristle brush
- Hot water
- Old rags or paper towels
Rust Removal Materials
- White vinegar
- Baking soda
- Steel wool (Grade #0 or #000)
- Fine-grit sandpaper (optional)
- Lye or electrolysis kit (for advanced users)
Seasoning Oils and Brushes
- Flaxseed oil, grapeseed oil, or vegetable shortening
- Lint-free cloths
- Foil or baking sheet (to catch drips in the oven)
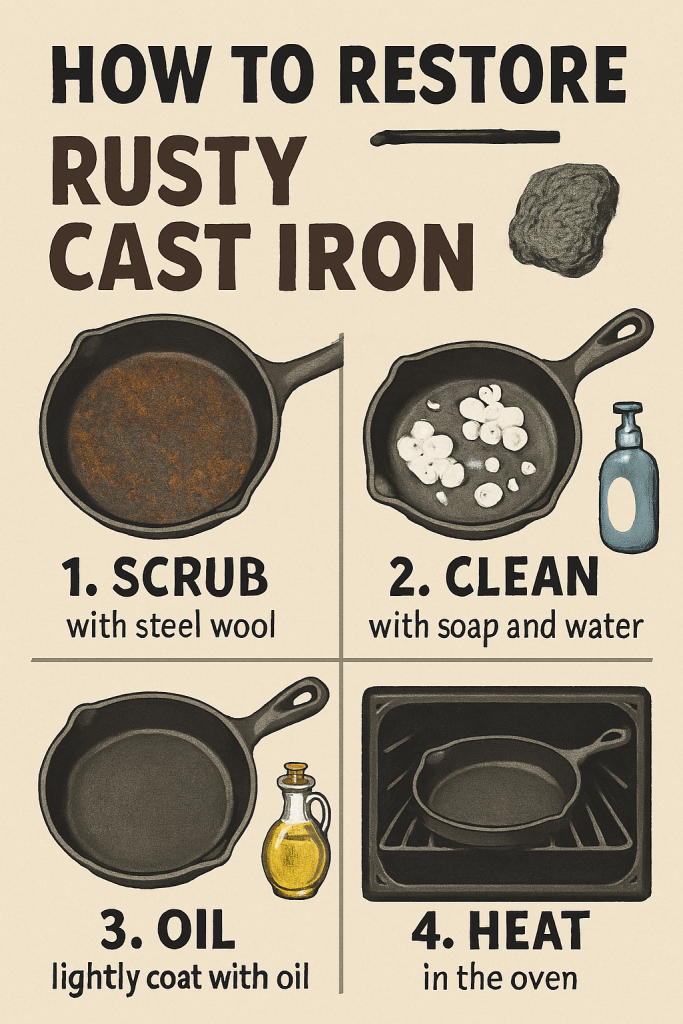
Step-by-Step Guide: How to Restore Rusty Cast Iron
Step 1: Assess the Damage
Check how much rust there is. If it’s a light surface dusting, simple scrubbing may suffice. For heavier rust, a full cleaning and re-seasoning will be needed.
Step 2: Strip the Old Seasoning (if needed)
For thick rust, remove the seasoning layer:
- Scrub with steel wool or sandpaper
- For heavy buildup, soak in a 50/50 vinegar-water solution for 1–6 hours
- Rinse and check regularly—don’t over-soak (vinegar can eat into the metal)
Step 3: Remove the Rust
Use steel wool, a wire brush, or a baking soda paste to scrub off rust manually. For extreme cases:
- Try electrolysis (using a battery charger and a solution of washing soda)
- Consider lye bath (caution: requires PPE and proper ventilation)
Step 4: Rinse and Dry Completely
Rinse thoroughly with warm water and scrub with a nylon brush. Immediately dry the pan with a towel and place it on the stove over low heat to evaporate residual moisture.
Step 5: Re-Season the Pan
Apply a thin layer of oil (inside and out). Buff off the excess until the surface appears almost dry.
Step 6: Multiple Seasoning Cycles
Place the pan upside down in a 450–500°F oven for 1 hour. Let it cool inside the oven. Repeat 2–3 times for best results.
Detailed Methods for Rust Removal
Vinegar Soak
- Mix 1:1 vinegar and water
- Submerge pan for up to 6 hours
- Check hourly to avoid metal erosion
- Rinse and neutralize with baking soda
Baking Soda Paste
- Mix water and baking soda into a paste
- Apply and let sit for 15–30 minutes
- Scrub with steel wool or a stiff brush
Steel Wool Scrub
- Use fine steel wool (Grade #0 or finer)
- Wet the surface and scrub in circles
- Rinse frequently and continue until rust is gone
Electrolysis Bath (Advanced Method)
- Requires battery charger, washing soda, water, and a sacrificial metal rod
- Safely removes deep rust and carbon buildup
- Only for experienced DIYers with proper safety setup
How to Season Cast Iron After Rust Removal
Choosing the Right Oil for Seasoning
- Flaxseed oil: Hardens into a durable polymer coating
- Grapeseed oil: Neutral taste, high smoke point
- Vegetable shortening or canola: Common, effective choices
Oven vs. Stove Seasoning Techniques
- Oven method: Most consistent. Bake at 450–500°F for 1 hour.
- Stove method: Good for touch-ups, but can produce uneven seasoning.
Common Mistakes During Seasoning
- Applying too much oil (causes sticky residue)
- Not heating the pan long enough
- Using flavored or low smoke point oils (like olive oil)
Post-Restoration Care: Preventing Rust from Coming Back
Cleaning Tips for Daily Use
- Wipe clean after each use
- Avoid soaking in water
- Use salt and oil for scrubbing tough spots
How to Dry and Store Properly
- Dry immediately after washing
- Heat on the stove for a few minutes to evaporate moisture
- Store in a dry place, uncovered, or with a paper towel between lid and pan
Re-Seasoning Frequency and Touch-Ups
- Reseason every few months or after cooking acidic foods
- Spot-season areas that lose shine or develop minor rust
Common Mistakes to Avoid When Restoring Cast Iron
Using Harsh Chemicals
- Avoid oven cleaner or harsh acids unless doing advanced restoration
- Never use bleach or dishwasher detergents
Skipping the Seasoning Step
A clean cast iron pan is vulnerable to rust until it’s seasoned. Always reapply oil and bake to protect the surface.
Leaving Moisture on the Surface
Never air dry cast iron. Water sitting on bare metal leads to flash rusting within hours.
Cast Iron Restoration for Vintage and Antique Cookware
How to Identify Valuable Vintage Pieces
- Look for old brand logos (e.g., Griswold, Wagner)
- Smooth cooking surfaces and hand-machined bottoms
- Lightweight compared to modern pans
Extra Precautions for Rare or Collector’s Items
- Avoid power tools or sandblasting
- Document condition before and after
- Consider professional restoration if valuable
Environmental and Cost Benefits of Restoring Cast Iron
Reducing Waste and Saving Money
Restoring old cast iron prevents landfill waste and extends cookware life by decades—saving you from rebuying new pans.
Cast Iron’s Longevity and Sustainability
Properly cared for, cast iron can be passed down through generations. Its reusability and lack of synthetic coatings make it one of the most eco-friendly cookware choices.
FAQs About Restoring Rusty Cast Iron
Q1: Can I cook with cast iron that has a little rust?
No. Always remove all rust and reseason before using.
Q2: How do I remove rust without steel wool?
Use baking soda, vinegar, or a wire brush as alternatives.
Q3: Is it okay to use soap on cast iron?
Yes, during restoration. For regular cleaning, use soap sparingly.
Q4: How often should I season cast iron?
Light seasoning touch-ups every few months; full oven re-seasoning 2–3 times per year.
Q5: What oil is best for seasoning?
Flaxseed and grapeseed oil are top choices. Avoid olive oil.
Q6: Can cast iron be ruined permanently?
Only if it cracks, warps, or is deeply pitted. Most surface rust can be reversed.
Conclusion: Revive, Restore, and Cook with Confidence
Rust doesn’t mean the end for your cast iron cookware—it’s just the start of a new chapter. With the right techniques, even the most neglected pan can be reborn and seasoned into a reliable cooking tool for years to come.
Restoring rusty cast iron is not only rewarding and sustainable, it connects you to a tradition of craftsmanship that spans generations. Roll up your sleeves, grab your steel wool, and bring that skillet back to life.


Leave a Reply